Everybody needs an old railroad signal in the backyard, right? I’ve always loved old searchlight signals, and I’ve long wanted one in the back yard. I have to admit, when most folks think about collectables and yard ornaments, these probably aren’t the first things that come to mind, but I’m not most people.
About two years ago I finally decided it was time to do something about that, so I started planning and hunting down all the pieces I’d need. It took me almost a year to acquire all the pieces, and another nine months to find the ambition and time to get it done, but thanks to being stuck at home for months due to everyone’s favorite virus, I finally got it done. Now I can sit out on the patio, drink a beer, and enjoy a big ol’ chunk of restored 1930s-1940s vintage railroad technology watching over me. I couldn’t be happier.
If you want to see what it took to get to this point, read on…
Acquiring the Pieces
The signal is a result of collecting parts for the last year or so. I found the US&S H-2 head on Craigslist from a gentleman out in Las Animas in November of 2018. He’d acquired it years earlier in west Texas, so it probably started off as an SP signal. It had a spotlight installed inside rather than the relay, and a phankill housing (with no phankill) on the front with a red-painted acrylic lens. For a base, it was bolted to a heavy old steel air compressor base. Still, the original front glass lens was there, and everything was relatively straight and undamaged, so cash was exchanged and by Sunday evening I was the owner of an H2 head with a lot of work ahead of me.


I removed the spotlight and phankill housing and immediately started the search for the inner relay and light assembly. In short order I’d tracked one down from a signal collector in central California. According to the inspection tag, it also was SP, and came out of service around 1992. I gave it a quick test on the bench to make sure it all worked as expected, and everything looked good. A little cleaning and some new bolts, and I was able to test the thing in the house using some bench power supplies shortly before Christmas 2018. Things were looking up – now I had an SP H2 housing and an SP H2 relay.


The mast was actually the hardest thing to find. I didn’t want one of the original cast iron versions. Not only are they insanely heavy, but I also didn’t want the signal to be full height (out of some pity for my neighbors), so I intended to cut it off. Cutting through a 6″ steel pipe didn’t sound like a whole lot of fun. I finally was able to buy an aluminum crossing signal mast from a railroad material dealer in Denver in the fall of 2019 for a couple hundred bucks. They were scrapping out a huge pile of signal parts, and were kind enough to sell me one of the masts before they all got loaded out for scrap. It was around 14′ tall when I got it, and I then lopped it off to 10’6″.


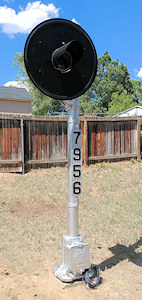
The rest was pretty easy to locate. The signal head mounting arm came from another signal collector out east thanks to a request on one of the signal collector groups. The finial came from Canon City via eBay. The milepost board came from a friend a few years back when he moved back to Kansas, but needed some repair work as one of the cast numbers was broken and the support beam twisted. The stainless U-bolts to hold the arm onto the mast came from eBay. The rest of the stainless hardware came from McMaster-Carr or Lowe’s.
(Why stainless? Why not? Even in Colorado’s very low humidity, regular steel will eventually find a way to rust. I’m not building thousands of signals – I’m building one and spending a few extra bucks on stainless fasteners to save future rust stains and seized bolts sounds like an excellent investment.)
Pouring the Base
Then came the base. Oh, I’d been procrastinating on this for some time, because every time I thought about it, my back screamed in pain just at the thought of all that digging, mixing, forming, and pouring. Finally on Monday, June 8, nearly 18 months after this project started and nine months after I had all the pieces, I stopped procrastinating and started digging.
It’s roughly 20″ square and 48″ deep of poured high strength concrete with four 3/4″ threaded rods embedded within it. The bottom 38″ are just a rough hole dug out with a trenching spade and post holer. After I finished the hole, I built a nice square form for the top ten inches so that it would look decent, and it also kept the four threaded rods in the right alignment to fit the base.
On Wednesday I took the afternoon off work and poured some 1200 pounds of concrete down the hole, all mixed and shoveled by hand. This was a handy reminder that I’m not in my 20s anymore, and I’ve gotten rather out of shape even for a 43-year old.
Embedded in the concrete are four 316 stainless steel 3/4″ threaded rods. Each is 36″ long, with a large (3″ diameter, 1/4″ thick) stainless fender washer suspended between two stainless nuts about 6″ from the bottom of the rod. I chose 316 stainless rather than 18-8 or 304 because of its additional resistance to all the chloride ions in the cement. That puts it roughly halfway down in the concrete mass. This provided solid anchoring into the concrete so the rod wouldn’t push out, either from upward or downward force. 5.5″ of rod was left above the top surface of the concrete. The signal base then sits upon another nut/fender washer on each rod, and another washer and nut secures it on the top. That way I can make minor leveling adjustments by moving the nuts up and down.
The other thing embedded in the concrete was a piece of 1″ schedule 40 plastic conduit, positioned right under the bottom exit hole from the wiring box at the bottom of the mast. That way I could neatly get the wires out of the box and underground.
 with a form at the top.")


Rattlecan Overhaul
Since all the parts had come from different places and different railroads, none of the silver matched. The head was in pretty good shape, but the arm was mildewy from its life in the southeast. The mile board paint had started to flake and it was looking a bit rusty. The aluminum mast, while not painted, was pretty beat up by the scrappers and had lots of surface scratches and abrasions. So I decided it was time for a little rattle-can overhaul to make it all look the same again.
The first step was to pressure wash everything to get as much loose crud off as I could. After drying and then waiting until evening when it wasn’t so incredibly hot, I painted everything. Rust-Oleum Professional Gloss Aluminum (the stuff in the silver can that says “professional”) is actually pretty good. It seems to stick well and it’s the right color for railroad aluminum. I gave everything that was supposed to be silver a good couple coats. I also painted the signal target face and hood with a couple coats of Rust-Oleum gloss black. Eventually I’ll take down the target and hood and have them sand-blasted and powder coated, but for now this was good enough.
The milepost was the hardest to do. After straightening it out, using a little JB Weld to put the broken number back together, and putting in new bolts, I rattle-canned the silver on to it and let it dry. After that, I took a small brush and a small can of black gloss enamel and hand-painted the numbers again.
Assembly
At that point, it was a simple matter of putting the mast on the base, leveling it up, and then tightening down the bolts. After that, on went the finial, then the arm with its U-bolts around the mast. With some help from a friend, we wrestled the head onto the arm around 10pm on Thursday. By 11, I had all the hardware in place, but decided to call it a night rather than work on wiring.
Friday brought other plans, but Saturday morning I was back on task. I got the wiring in and fired it up for the first time, just to make sure the wiring all worked and the relay wasn’t harmed from all the jostling about trying to get the head up on the pole. When the paint on the mile marker dried, I mounted that on pole and called it good.


That’s it for now. I’m working on electronic controls that will allow me to control it from the house via wifi and some scripts to sync it with ATCS, but that’s still weeks in the future.