
Let’s face it, I’ve been messing with photovoltaics in one form or another for 35 years. First there was a small portable battery charger I built out of small cells in high school. Then came five years of college at Iowa State University working on the electrical systems of three generations of solar-powered race cars (Cynergy, Excytor, and Phoenix for any fellow Team PrISUm alumni).
While I’ve been looking at grid-tied solar for the house for about a decade now, the combination of cost, efficiency, and reliability wasn’t quite there to make me take the leap. I think the trigger event was really the great deep freeze of February 2021, which sent price ripples through the energy market even up here, as the spot price for both power and natural gas shot up to unholy levels and triggered utility bill surcharges in the following months to recoup those costs. As someone very much looking at retiring in the next few years, hedging against uncertain spikes in energy prices was looking very attractive.
It’s not that I hadn’t been working towards the goal. My house is almost completely electric now. Electric range, electric dryer, electric water heater, and as of 2021, an electric heat pump that does probably 85% of the heating and cooling. (The backup furnace is still natural gas.) As things get remodeled and modernized, they also get electrified with an eye towards energy efficiency. The move to solar power and energy self-sufficiency has been coming for a long time and lots of decisions have been made moving in that direction.
In the fall of 2021 with the electric service upgraded to 200A and the heat pump happily heating and cooling the house, I turned my attention to photovoltaics. Realizing that the tax credit would be dropping from 26% to 22% in 2023, I felt 2022 would be the optimal time to do it. However, with pandemic-related delays and every contractor I talked to being scared of my roof, I wasn’t making much progress. Not much actual progress happened for another year.
When Congress bumped the incentive tax credits back to 30% in August of 2022 and Colorado still had net metering and property tax exemptions on solar arrays, I decided that was too good of an opportunity to last. Material and labor costs were going nowhere but up, and eventually various governmental agencies will start dialing back the incentives as more and more people decide it just makes financial sense without them. So I kicked my planning into high gear and started once again making calls in earnest. 2023 was going to be the year I finally started generating my own power.
The Roof & Choosing a Solar Contractor
I kept hitting the same roadblock in 2022 that I’d hit in 2021. Every single reputable solar company I’d talk to would take one look at my roof and just nope right out before even bidding on the project. It wasn’t that my roof was in bad shape or anything – it was just different than they were used to. After doing repeated roof replacements due to hail (welcome to July on the Front Range!), I put Gerard stone-coated steel roofing on after a particularly apocalyptic storm in 2012. I love my roof – it’s been absolutely amazing and has saved me from probably 2-3 roof replacements since. But because this roofing was different and there was plenty of demand for solar work on standard asphalt-shingled roofs, every single solar company ran screaming as soon as I mentioned it.
Finally in frustration I called my roofers – Horn Brothers. (Love those guys, btw – if you need a roofer in Colorado, I highly recommend them.) They gave me three companies that they worked with and that had experience with stone-coated steel roofing. I called all three and got each to work up a proposal.
Two of the three sent proposals without really asking questions about what I was looking for and any specific requirements. Then when we’d set up a call to go over them, it was obvious that the person on the other end had no engineering background nor could answer specific questions like “Why did you select X vs Y?” or “Why did you lay out the panels this way rather than other options?” It was like talking to one of those IVR systems – their job was to walk you through the standard flow, not have an interactive conversation about options.
The third actually sent an engineer to the conversation that could answer real questions and work through various options. They came with the same sort of presentation, but immediately we could start diving into the details and making adjustments to make the system match exactly what I was looking for. It didn’t hurt that they also came in significantly cheaper than everybody else as well. That contractor? SunTalk Solar out of Denver.
Array Sizing and Location
My power usage runs about 900-1200 kWh every month currently, and Colorado law requires true net metering at the moment up to 10kW (actual output power) for residential applications with municipal utilities like Colorado Springs Utilities.
My array size would largely be limited by the 120% rule because of my breaker box. (See below under “Things I Wish I’d Known” – “That Damned 120% Rule”) That meant essentially I was stuck at a maximum infeed of 32 amps, or 7680 watts at 240V nominal. Each IQ7+ limits power output to 290W continuous, so I could have up to 26 of them and just squeak in under the limit. (See the next section on microinverters to see where I came up with this.)
The garage roof would get filled first, since it faces directly south, is only shaded briefly in the late evening from the neighbor’s tree, and is angled at almost the optimal tilt for year-round power generation. Given the necessary set-backs from the edge, fourteen panels fit there. Next we filled up the west-facing roof, which because of its height got well over any shadows cast by the neighbors. Working around the area that would be shaded by the chimney, that provided another nine panels. In order to max out the system, the remaining three panels were put on the east-facing roof, up near the ridge line and towards the rear of the house.
My Requirements – Panels
As far as panels, I wanted to balance aesthetics (so all black, despite the additional heat and efficiency loss), cost, efficiency, and made in the USA – or at least North America. Seems like working on modernizing the US’s power infrastructure should start with spending money here at home, or at the very least not sending money to less-than-friendly countries. After looking at a number of different options, I finally settled on Silfab SIL-370-HC panels – their basic residential line – based on the balance of warranty, price, and power output.
My Requirements – Microinverters
Fundamentally, I knew I wanted microinverters rather than string inverters. Micro-inverters are small (usually <400W) inverters that are literally installed on the back of each solar panel and convert its output (<45 VDC) directly to 240VAC house current right there. String inverters – the traditional approach – hook up to ~16 panels or so together to give you high voltage DC – up to around 600VDC or so.
I’ve spent enough time around high voltage DC to know that it scares the crap out of me. Once you get a DC arc going from any sort of fault, there’s no stopping it until serious damage is done, up to and including fire. Not that 240VAC can’t make a mess as well, but generally it’s self-limiting. Either the gap will grow too wide and the arc will shut down, or it’ll arc over to something grounded and pop a breaker. Modern high voltage DC inverters (otherwise known as “string inverters”) have built-in arc fault detection, but I’d rather avoid the issue entirely.
It used to be that if you string all those panels together, your output power would be limited going to be constrained by the most limited panel. For example, if one gets a couple leaves on it, that shading will limit the string. Now to comply with rapid shutdown requirements, they install “optimizers” (essentially power point trackers) on each panel. But now we’re back to tacking microcontrollers and switching converters on each panel, so why not just put the whole dang inverter out there?
The other thing pushing me towards microinverters was reliability and redundancy. If a big string inverter fails, you’re losing a whole bunch of production and potentially looking at a few thousand dollars in replacement cost. If a microinverter fails, you’ve lost one panel (a few hundred watts) and if you have to pay to replace it, it’s maybe $200 at most.
SolarEdge – who two of my potential contractors were specifying – only warrants their string inverters for 12 years or so by default, but will sell you a 20 or 25 year warranty. Enphase, my microinverter vendor of choice – warrants for 25 years out of the box.
So, Enphase IQ7-series microinverters it was!
The Actual Build
The contract with SunTalk was signed on October 24, 2022. A preliminary design was completed in early December 2022, and complete, stamped engineering plans were submitted to the Pikes Peak Regional Building Department in January. The Colorado Springs Utilities review of those took several months, but Regional granted permits on April 1, 2023.
It took a bit for actual construction to get started. The reason always given was delay in getting the roofer scheduled along with the solar crew to complete the modifications to my unusual roof. However, after a couple delays and false starts, the crew arrived on July 20 to install roof mounts and start the electrical work. Getting to actually installing racking, inverters, and panels took another week, and then it took two more weeks before they came down to finish the final connections in the back of the house.
I suspect much of the delay was because I was all the way down in southern Colorado Springs, and that’s going to be three hours of your work day on the road down and back, so you’re not going to schedule it unless you’ve got more work in town. One time they forgot flex conduit, one time they didn’t have some conduit piece they needed for the box in the back, and one time it was because they couldn’t get the inspectors scheduled for that day, so it wasn’t worth making the trip down when they’d just have to do it again.
CSU popped in the new meters on August 17 and gave me verbal permission to energize, followed by an official permission to operate (PTO) letter a few days later on August 22.
Honestly I’m quite happy with their workmanship and the quality of the job. The only thing they desperately need is a better project management / scheduling team, because there was a lot of me bugging them for progress reports, and a lot of last minute rescheduling during the actual install.


 of the house.")


The Results
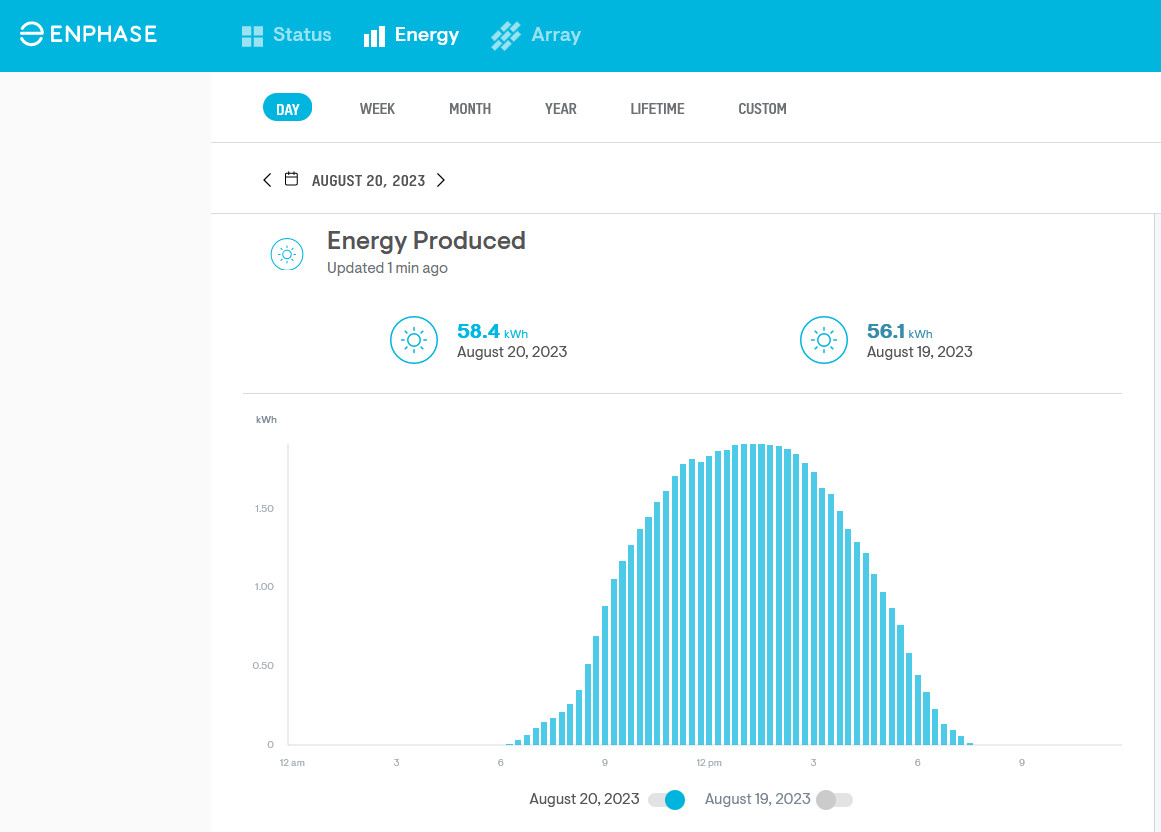
Fortunately, two days after the array was energized, I got a beautiful, cloudless day on August 20 to get a feel for what this thing could really put out. My guess is once you get it to peak sun in June, it’ll do 60kWh/day easily, but we’ll see next summer.
By the time I’m posting this, I’ve now had the array online for a month and gotten the first power bill out of it. Normally my electric bill ranges from $110 during the temperate months when I just leave the windows open and the HVAC off (again, it’s Colorado – there’s entire weeks or months you can do this) to close to $200 if I’m running the heat pump or air conditioner hard. As expected, the array covers my total usage, plus banking enough that it should help get me through the winter without paying for power.
The financials work out even for current rates and the system paid for itself in something like 7-8 years, making it a safer place to park my money than anything I could find on Wall Street right now. But the real reason I did this was with an eye towards the future. As I approach the point I want to retire from Corporate America, I want to hedge my bets against unexpected expenses and shocks, and reduce the number of bills I have to pay every month.
Only days after the array came online, CSU announced an 8% increase on base electric rates. Seems like my plan is already working.
Things I Wish I’d Known
Like most projects into the unknown, there’s things I wish I would have known before I got started.
Panel Output Ratings are a Lie – Okay, they’re not a blatant lie, but they’re confusing until you understand what they really mean. For example, my Silfab SIL-370HC panels are rated for 370 watts. So you then look at my IQ7+ microinverters and go, “Wait a minute, these inverters can only do 290W continuous. Why am I constraining my panel with this inverter that wastes up to a quarter of my panel wattage?”
Yeah, you’re not. The panel is rated for 370W at standard temperature and conditions – basically 25C under 1kw/m2 of illumination. This is most commonly noted as “STC” in the datasheet, and provides a uniform way to compare one panel to the next in the lab. It has almost no bearing on reality, as your panel will never operate under those conditions. That’s basically saying your big black solar panel is going to sit perfectly aligned under noon sun and somehow be a comfortable 25C (77F). What you really want to be looking at is the panel’s NOCT rating – basically what the panel will actually produce under normal operating cell temperatures. In the case of mine, that’s 276 watts, or sliding in just under the 290 watt limit of the inverter. So while if operating in particularly favorable conditions (such as at high altitude in Colorado where we get better than 1kW/m2 illumination) it may lose a little power off the top, under normal conditions the inverter will handle everything the panel throws at it.
Solar Array Sizes are a Lie – Dovetailing into the lie above comes the next one. Solar designers just add up the STC power of all the panels and call that the “array size”. So by their math, my array of 26x 370W panels is a 9.62kW array. It’s not, it will never in its life produce that for instantaneous power. NOCT rating on the array would be in the 7.18kW range, which is much more realistic. Even assuming the panels are all operating in blazing sun and are frigidly cold – thus producing spectacular DC power – the microinverters will only put out 290W each, or 7.54kW. That’s the absolute maximum the array will ever feed back into your electrical system.
When the sales guy is trying to sell you the array, he’s going to quote the STC DC output rating, because it’s the biggest number. You will never get that much power. When you’re doing the math about payback intervals, realistic output, wire and breaker sizing, etc., you need to consider both panel NOTC output and inverter limits.
Panel Direction Doesn’t Matter That Much – My house faces almost due south, with roof surfaces going south, east, and west. 14 panels are on the garage roof, which angles to the south. Those are the sweet spot. They’re angled almost perfectly for optimal year-round power generation, according to the various models. Then I have 10 panels on the west roof towards the ridge, and 3 panels on the east roof. Guess what? Those panels that face east or west are within 5-8% of the south-facing panels in terms of net production. Sure, optimize where possible, but otherwise don’t be afraid to amortize some of those fixed project costs over some more panels if you can.
Enphase Power Line Communication Doesn’t Affect Insteon – This is actually a huge positive, and something I was concerned about up until the system was energized. The Enphase microinverters use power line communication – essentially a high frequency signal imposed on the 60Hz AC power – to communicate back with their monitoring system. They run at a communication frequency of about 110 kHz. My home automation is all based on Insteon, which also uses power line communication but at 131.65 kHz. Yes, those numbers are different, but they’re close enough I had definite concerns that one would step on the other and neither would work. Good news – almost a month in, I’ve seen zero problems. The Insteon stuff seems to be seeing a bit more traffic, so I’m guessing there’s some interference, but I haven’t seen any signs of actual impact on operations.
That Damned 120% Rule – There’s two ways to attach solar generation to your power system. The first is called a “line side connection”, where generation is tapped into your primary power feed between the meter and the main breaker in your service panel. That’s great if there’s some big ol’ wires between your meter and your main breaker. My house uses what’s known as a “meter-main panel”, where the meter is directly connected to the main breaker with bus bars. There’s no way to tap those. So you have to feed power in through a breaker, known as a “load side connection”.
The National Electric Code allows you to have infeed breakers totalling up to 120% of the rating of the backplane bus bar in the panel. So for example, my panel has a 200 amp backplane. My main breaker is 200 amps, meaning I can only add another 40 amp breaker as infeed. Then add the 80% rule on top of that – any circuit can only operate at 80% of the breaker / wire capacity continuously – and you find you can only feed in 32A of solar power, or 7.68kW of actual power.
If I’d known about this, I would have had my electrician put in a “solar ready” panel when we swapped out the old Federal Pacific box a few years ago. Those panels have 225A bus bars in the back, so you can feed in significantly more solar, and they have provisions in the meter-to-breaker bus bar to add consumption monitoring current transformers.
I could still get around the limit by replacing the main breaker with a 175A unit, which would give me another 25A of solar, but at the moment it isn’t worth it.
This Takes Forever – This isn’t going to be like any other electrical house project. You’re dealing with permitting and utility company engineering departments here, which are big, slow, and deliberative. They are charged with maintaining system stability while also allowing the integration of all of this variable generation that’s outside their control, so they’ve got a tough job to do. Plus you’re dealing with contractors facing labor shortages, component shortages, etc. As I mentioned above, I started looking for a contractor in October 2022. We signed the contract in November, and had stamped engineering drawings the first week of December showing the electrical as well as a structural engineer approving the changes in roof loading given the racking system and anticipated wind/snow loads. Permitting then took four months for both Colorado Springs Utilities (CSU) and Pikes Peak Regional Building to sign off on it. Starting construction took another 4 months due to various delays, and took several weeks to complete given delays related to crew scheduling and delays getting a couple parts. Then from system completion and inspection, it took about two weeks for CSU to come, sign off, pop in the production meter, and grant permission to operate (PTO). Start to finish, ten months, almost to the day, and that doesn’t include the other weeks/months spent on past abortive attempts.